Horsetalk
Courtesy of BELSTANE (and of course MYLER) we provide you with more information regarding
Myler bits,
how they work and how to fit them correcty.
Our thanks also go to Hilary Vernon.
_____________________________________
Understanding the Myler Bitting System
The Myler Bitting System was invented by 3 American brothers, who were looking for a gentler, more effective way of communicating with horses.
IN GENERAL
Comfort and Welfare
The Myler Bitting Philosophy is based on making the horse as comfortable as possible in its mouth, so it can be relaxed and concentrate on what its rider is asking it. As all horses are different in their anatomy, disposition and behaviour, and as their needs change throughout their training, there are 30 different Myler Bit mouthpieces and a wide choice of cheek styles, to make sure that there is a suitable choice of bit for each individual horse and its rider.
Part of the Puzzle
No bit will hurt a horse on its own without someone hauling on the reins. Equally, no bit will train a horse, or make up for impatience or poor riding. Effective bitting is only part of the whole approach to good horsemanship, but just like every other part, it needs careful and informed attention. The Myler Bit range enables the rider to choose the most comfortable bit with the clearest signalling action for each individual horse, so the communication between horse and rider is as smooth, effective and efficient as possible.
Resistance
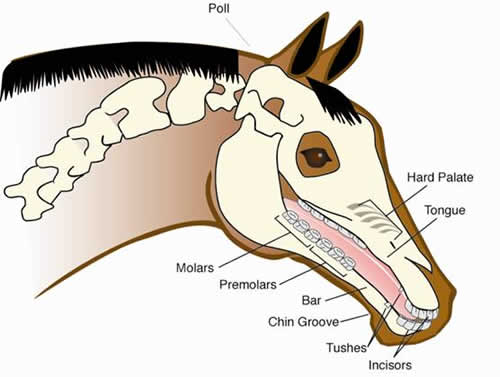
Not being able to talk, horses are able to communicate with us only by resistance or relaxation. The main reason horses resist bits, in whatever way, is to escape the pressure on their tongues, which prevents swallowing, (try pressing your finger onto the centre of your tongue and trying to swallow).
Bit Action
Generally, bit pressure works on the tongue and the bars (and the head in some cases), to control and train the horse. Most bits, and definitely all snaffles, roll down into the tongue to a certain extent (depending on the cheek style used), when the rider exerts rein pressure. The main differences with the Myler system are:
- that the pressure is as comfortable as possible and non-damaging and there is more tongue room to allow swallowing. (All mouthpieces are curved, some have ports, and they have barrels, or sleeves, covering the joints, to prevent pinching and to produce more of a “wrap” feel rather than the nutcracker action on the bars given by most snaffle-type bits)
- that the horse is rewarded by the pressure being released more effectively when he does what is asked (eg. brings his head into the desired position)
- that the independent side action (see below) allows a much clearer signal to the horse
- that the most appropriate bit is used for each individual horse at that specific period of his training.
Slotted Cheeks, or “Hooks”
Most of the cheeks are available with hooks, (like slots), to fix the
position of the bridle and the reins on the cheek ring of the bit. The top
hook (for the cheek pieces) does precisely what the fulmer, or full cheek, does
when used, (as it was designed to be), with leather keepers. It
stabilises the bit inside the horse’s mouth and holds it off the tongue when
the rider is not applying pressure. When used, the rein hook allows the
rider to get more leverage, exerting pressure on the tongue as the bit was
designed to do, - but more efficiently, - so less pressure is necessary. In
this way the backward pressure on the horse’s mouth is less severe and/or
prolonged. It also allows a little pressure to be applied to the poll. The hooks, therefore, allow the bit to be used as it was designed to be, but more effectively, more gently, and with instant release for the horse as soon as it does what has been asked of it. This will also help the rider to have quieter hands.
Independent Side Action
Most Myler Bits have independent side action, wherein one side of the bit moves without the other, using the barrel as a pivot. This gives a clearer signal when turning or working a horse that is stiff on one rein, or when lifting a shoulder on a bend, as it allows that side of the bit to be activated, without at the same time driving the centre joint down into the tongue, as happens with an ordinary snaffle.
Myler Combination Bit
The Myler Combination Bit is one of the kindest bits available. It spreads the rein pressure exerted by the rider over several different areas. Initially, it acts on the nose; poll and back of the jaw, with the mouthpiece “floating". 1/3 of the total pressure will be felt in each of these three areas. Only if the rider continues to pull on the reins will the mouthpiece engage, as it moves up against a little “stop” on the cheek ring and activates on the tongue and bars like a “normal” mouthpiece. At this point, the pressure exerted by the rider is spread over 5 areas – nose; poll; jaw: tongue; and bars. The Myler Combination Bit is available in 5 different mouthpieces and in a short, medium and a long shanked version.
It is particularly suitable as the first bit for a young horse, which will be used to head-pressure signals from being led in a head collar. It is also a great bit for horses who are very nervous in the mouth; ex-racehorses who have been trained to “run into their mouths” and are reluctant to come into a schooled-horse outline; and older horses who think they know it all and will benefit from a very different feel in the communication they receive from the rider.
Levels of Training
Rather than just using one bit throughout your horse’s working life, the Myler system is progressive and different bits may be required as your horse moves through his training. The bits are rated according to the horse’s level of training:
Level One:
A horse at Level One is at the beginning of its training, where basic balance and obedience is being asked for (eg. trot to walk, walk to halt, basic turning, etc.) and where few of the rider’s body aids are understood.
Level one bits use mainly tongue pressure. There will also be a little bar pressure and, depending on the style of bit, some curb or poll pressure, but a Level One bit basically uses the sensitivity of the tongue to give clear, concentrated signals at its centre. The pressure can be released quickly and evenly when the horse does as he is asked.
Levels Two and Two-Three:
A horse at Level Two has achieved a basic training, and is now progressing in a particular discipline, with a degree of balance and collection. He will be relaxed and fully broken at the poll and will be able to hold his outline when rein pressure is released. He will be stronger and able to sustain longer periods of work with better concentration and understanding. At this stage the rider wants to refine and define his aids for more precise work.
Level Two and Level Two-Three Bits still use the tongue for signalling and control, but with more subtle pressure, spread across the tongue, and with ports introduced in Level Two/Three. The horse has shown that he can work without the concentrated tongue pressure of a Level One Bit, but it is still too early to release the tongue completely. The bars, curb and poll may also be utilised to a certain extent and Independent Side Action becomes very important as the work becomes more complex.
Level Three:
The third level of training relates to a “finished” horse from whom quite a high degree of collection and athleticism is expected. A Level Three horse will be relaxed and will work well off the rider’s seat, leg and hand.
Mouthpieces at this level give maximum tongue relief, working largely off the bars with a little poll and/or curb pressure, although the appropriate bit will depend very much on the horse’s disposition.
The Myler approach is that you allow a horse more freedom gradually as he progresses through his training, rather like gradually allowing a child more and more responsibility as he matures. The Mylers point out that we do not communicate and interact with a small child in the same way we do with a teenager, or indeed another adult, so why should we seek to use the same communication tool throughout our horse’s training?
Most snaffle-type bits are level 1, and if a horse is resisting a traditional snaffle, there is not much point putting him into a Myler level 1 bit, because it will act in a similar way, (albeit more comfortably). The horse is probably trying to communicate that he needs more tongue room, so a level 2 or 3 bit, depending on what stage he is at, would probably be more suitable.
Advice
It is vital that horses are bitted individually for their specific needs. All Myler Retailers are trained to be able to help their customers select the most appropriate bit for their particular horse; further advice is available through Belstane if required. The Myler's book "A Whole Bit Better" is a good, straightforward read, with lots of information on how bits work in the horse’s mouth in general, and about Myler Bits in particular. It costs about £10 and really does help to identify what a horse is trying to tell us about the bit in his mouth. A DVD of the same title is also available. This covers a comprehensive seminar given by Dale Myler, includes interviews with top riders, drivers and trainers from all disciplines; and uses detailed graphics to explain the principles of good bitting.
The Myler Team
The Myler Team UK was formed in 2002 with a group of well-respected horsemen from across all disciplines, both amateur and professional, including both top and up-and-coming junior competitors. The Team members are all enthusiastic proponents of The Myler Bitting System and are working with Belstane to promote better understanding of The Myler System, and, indeed, bitting in general.
Team Members include Christopher Bartle; Nicky Barrett; Jeanette Brakewell; Beccy Broughton; Clayton and Lucinda Fredericks; Richard Maxwell; Bob Mayhew; Robert Oliver; Nick Skelton; and many others.
RESISTANCES AND EVASIONS
There are various signs of resistance to the rider, including:
Being Behind the Bit, where the horse brings his head back further than 90o to the ground, tucking his head into his chest. This moves the horse’s centre of gravity forward, pushing his weight onto his forehand and making him stiff and heavy in the shoulder and weak in the hind quarters.
The rider will automatically give the horse more rein to encourage him to move his head out, and the horse will thereby have reduced the rein pressure on his tongue so he is able to swallow.
 |
Being Inverted, or Above the Bit, where the horse pokes his nose, or flips his head, snatching at the reins. The horse will be stiff through the poll, with his lower neck braced and possibly overdeveloped at the expense of his top line.
The horse is trying to change the angle of bit pressure, so he can get his tongue underneath the pressure, where he will be free to swallow.
Over-Active Mouth, including:
Chomping - where the horse constantly chews and mouths his bit
He is using his tongue and jaw to move the mouthpiece away from his tongue so he can swallow
Opening the Mouth -, where the horse “yawns” its mouth wide, also causing him to be stiff from his jaw right along the length of his body.
Again, the horse has changed the angle at which the pressure acts on the mouth. Only the bottom half of the jaw moves, and as it drops, it takes the tongue away from the pressure and allows the horse to swallow.
Crossing the Jaw - where the horse moves his lower jaw sideways.
The tongue will move with the lower jaw, thereby evading some of the pressure from the bit and allowing the horse to swallow
Moving the Tongue - the horse can get his tongue over the bit, stick it outside his mouth or pull it right back into his throat.
All these actions will free the tongue up so the horse can swallow
Leaning, the horse can lean forward onto the bit, with his head lowered, making him very heavy on the forehand. The horse is trying to get his tongue below the action of the bit so he can swallow.
 |
 |
However the horse resists the rider’s rein signals, it is his attempt to evade the pressure of the bit on his tongue so he can swallow.
The traditional approach to a resisting horse is to increase the severity of the bit, or to add gadgets such as flash nosebands or martingales. These do not solve the problem, but merely mask the symptoms, forcing the horse, through pain or immobility, to submit to the bit.
The Myler approach is completely the opposite. Seeing the bit far more as a means of communication than a means of control, the Mylers advocate using the most comfortable bit possible, so that no restrictive gadgets are required to force the horse into the “correct” position. The horse’s tongue should be given as much release as is right for that particular animal at that particular stage in its training, and the most appropriately shaped bit selected to suit the mouth of each individual horse.
The Mylers' aim is to make the horse comfortable and accepting of its bit, so it can relax and concentrate on what its rider is asking it to do.
STARTING A HORSE IN A MYLER BIT
Take your time - a Myler bit is completely different to anything else your horse will have experienced. Don't try one for 5 minutes and then decide it's a "no-go" .
Fitting Instructions
The height of the purchase is different in every bit, so before you try a new bit on your horse, attach it to the bridle and hold it up to the side of his face, so you can estimate the correct adjustment of the cheek pieces as closely as possible.
Height
The bit should fit snugly into the corners of the lips, normally making one wrinkle, but do check how it lies inside the horse’s mouth. If you pull down lightly on the bit cheeks, there should not be a gap of more than 1/8” between the mouthpiece and the corners of the lips. If the cheek pieces bow out, this is also a sign that the bit is too low.
Width
Ensure the bit is both level and central in the horse’s mouth, there now should be between 1/8 and ¼” gap between the bit ring and the horse’s lip on each side. (You may have to straighten the mouthpiece to assess this properly in a jointed bit by pulling the cheeks gently outwards.)
If the bit is too wide, it will slide from side to side in the mouth and give uneven pressure when engaged by the rider. An over-wide jointed bit could hang too low in the mouth and interfere with the horse’s incisors.
If the bit is too narrow, the cheeks will squash against the sides of the horse’s face and lips, causing rubbing or pinching.
Flashes, Martingales, etc.
The entire point of The Myler System is to make the horse comfortable and relaxed in his bit, so there is no need for any gadgets designed purely to force the horse to endure an uncomfortable bit by strapping his mouth shut, holding his head down, etc. Such equipment also infringes the horse’s ability to communicate with you. Therefore, a plain loosely fitted cavesson noseband is normally the most that should be required besides the headstall and reins, especially as you should be in a controlled environment while you accustom your horse to the new bit.
Loose Ring Cheeks
Take care to ensure there is a good ¼” gap between the rings and the sides of the horse’s face or the lips could be drawn into the ring hole in the mouthpiece and pinched.
Cheeked and Ring Snaffles
Check that the upstand of the cheek doesn’t rub against the side of the horse’s face. Full cheeked snaffles should have a leather bit keeper attaching the top of the cheek to the cheekpiece. This holds the bit up in the horse’s mouth to give a clear reward signal and is also critical for ISM.
Cheeks with Hooks (slots)
The top hook should always be used. This holds the bit up in the horse’s mouth to give a clear reward signal and enables ISM.
In order to balance the bit correctly, the cheek pieces must be fastened around the outside branch of the upper hook, leaving the metal on the inside branch against the horse’s face and giving the bit a “normal” appearance from the side.
To make the ISM as effective as possible, the reins should be attached to the bottom hook, again around the outer branch.
Pelhams and Kimblewicks
The curb chain should be fitted at 45o and should engage when the cheek has been rotated to about a 450 angle, normally around 2 fingers width. If it is fitted too loosely the mouthpiece can roll too far down into the tongue before the curb activates too late and too hard, possibly upsetting your horse and not giving you the control you need. If it is fitted too tightly, the horse will never get relief from the pressure, he will have no comfort zone and will be unhappy and distracted.
Starting a Horse in a Myler Combination Bit
Please see the complete section below on this particular bit.
Transitioning
TAKE YOUR TIME. Sometimes a horse will let you know that you have the right or wrong bit in as little as 20 minutes, but it often takes a few sessions in a new bit to know for sure. Plan up to 10 or 12 days before you can be certain that you have made the correct choice and make sure this is a quiet time for you and your horse, with no competitions or big outings.
GIVE YOUR HORSE TIME. Allow your horse to get used to the taste and the feel of the new bit, let him test this new equipment before you mount. Ensure the fitting is correct and then allow him to investigate the bit with his tongue. He may chew a bit more than normal while he gets used to the new feel. Ideally, allow him to stand bridled but loose in the stable, supervised but not held, with the reins tucked behind the stirrup leathers, for 10 or 15 minutes so he can settle down and relax.
The next step is to simulate the bit’s action prior to mounting so the horse can anticipate how the bit will work. This exercise also allows you to anticipate his behaviour with the bit. In the stable, or enclosed school, stand by his left shoulder and place the reins over his neck as if you were going to mount. Hold both reins just in front of the withers to mimic where the reins would be when mounted. Next, steady the reins in one hand and gently apply rein pressure with the other, activating the bit and asking your horse to relax at the poll. When he gives to the pressure by “nodding” his head onto the vertical, release the pressure with your hand. He may take a few steps backwards or forwards until he gets used to the idea but you are aiming for him gently to lower his head onto the vertical, releasing his own pressure and learning where the “Comfort Zone” is. This is a great way to introduce new bits as well as to supple a horse prior to work every day. The Mylers highly recommend working with your horse on the ground as part of the transition to any new bit and as a daily suppling exercise.
Ensure your horse is in a safe environment before you mount and then walk away on a loose rein for a few minutes. Slowly, slowly take up a light contact and walk round the area quietly while you both become accustomed to the feel of the new bit. When you feel the horse is ready to come into the bridle, just close your fingers on the reins, ask the horse to move forward with your seat and leg and when he gives to you, coming into the bridle, release the rein pressure immediately by opening your fingers and maintain only a very light contact to ensure he recognises the reward. Any new equipment or training approach should be introduced in a safe environment like a school, until you are confident that both are ready to work outside.
Anticipate some resistance. If your horse has been resistant in his current bit, there is a strong likelihood he will be resistant in his new bit. Simply put - he is going to try what he knows and some evasions will have become learnt habit rather than direct reactions to his bit.
Chomping and chewing: This may take some patience on your part and some trust on your horse’s part. Horses generally chomp and chew as a resistance to too much tongue pressure. With your new Myler Bit, he should not have as much tongue pressure as before, but it may take your horse some time to realise this. He will need to build trust that his new bit isn’t going to restrict his tongue like his previous one did. So, give your horse time to learn to relax - this may take days. Be sure you are releasing the pressure when he is in the correct position. If you are constantly applying pressure on his mouth, he may not be able to relax.
Inverting: Inversion is fairly common. The main thing your horse is doing is controlling the application of the bit’s action by staying up out of the “pressure zone”. Your new bit should give the pressure you need to ask him to relax at the poll and come into his “comfort zone” where he will have the relief he’s looking for. Many horses will try to invert with the new bit - you will need to ask the horse to go forward and apply consistent pressure until they relax at the poll. As soon as the horse relaxes at the poll, release the rein pressure. Always ask the horse to go forward. Some horses may resist by stopping, flipping their head, grabbing the bit, etc., but always ask him to go forward.
Leverage and curb pressure can be very helpful for horses that invert by clearly rolling the mouthpiece downwards and introducing new points of pressure, eg curb and poll, so use of the hooks is recommended to maximise this. The occasional use of a curb chain on a snaffle bit can also be useful. Be sure your curb strap or chain is adjusted properly with room for only two fingers. Too loose and the cheek rotates too far around before engaging the curb chain. The curb chain activates too late and too hard, possibly upsetting your horse and not giving you the control you are looking for. Too tight and the horse is not rewarded with a comfort zone and is uncomfortable and distracted. When adjusted correctly, the curb chain engages when the cheek has been rotated approximately 45o, adding more downward pressure to the mouthpiece, and offering more control and encouragement for the horse to relax at the poll and stay balanced.
Because an inverted horse is not used to working while relaxed at the poll, he will tire quickly and easily. Keep sessions short and always finish on a good note where the horse releases himself.
Horse Behind the Bit: Horses typically hide behind the bit because mouthpiece pressure is too strong or applied to too wide an area. Your new Myler Bit should offer less pressure, but the horse will need transition time to learn to trust this. Give him time and make sure you release properly when he is relaxed at the poll. If you do not release, he will not experience the “comfort zone” while relaxed at the poll and will continue to curl up behind the bit.
Not Stopping, or Pulling: Horses that don’t stop well or that pull are resisting by putting their own pressure into the bit to control it. Your new Myler Bit should give you the pressure you need for control and correction whilst also providing the relief and “comfort zone” to keep your horse happy and help him learn. Introduce your horse to the new bit slowly so that he can learn to trust having a “comfort zone.” Use pressure as necessary for control, but be sure to reward your horse by releasing rein pressure when he stops as asked. Your horse should get lighter and less resistant with time, but he may have a lot of 'baggage' to get rid of, so don't be in any kind of a hurry if you want to do this well.
Dropping a Shoulder: Horses generally drop a shoulder for two main reasons: laziness or anxiety. Horses usually take the easy route and will cheat you on a corner by leaning in - it’s less work than staying straight! At other times, they know their job so well that they try to be better at it than you want, – for instance when a jumper runs through a turn towards his next jump. He is too anxious and starts to lean on the inside shoulder too much and risks loosing his balance, the turn and valuable time. Your new Myler Bit should help you send a signal to keep his shoulder up - Independent Side Movement is perfect for this.
When using Independent Side Movement, you will isolate one side of the bit, lift subtly with that side and not affect the other. It works best supported by an inside leg aid for turns, bending and balancing.Myler Bits with Independent Side Movement are simpler and clearer in their signalling than traditional bits, so you should find your horse responds well to this new, unambiguous communication.
As a rider, you may find Independent Side Movement requires some adjustment in your riding technique. You may find you can be much more subtle in your actions as you ask your horse to bend or lift up his shoulder. The need to reward your horse by releasing the pressure the instant he has done as he has been asked cannot be over-emphasised.
In Conclusion:
To get the best out of your Myler Bit (and your horse):
- Take it slowly and quietly.
- Listen to your horse, he is trying to tell you what he needs in order to do what you want.
- No bit makes up for bad riding or impatience and a bit cannot train your horse. That's your job, - just make sure you have the best equipment and knowledge to communicate with him effectively.
- Have fun, or there's no point!
- Understand what the bit, - and your hands on the ends of the reins, - are doing in your horse's mouth. - Think about what is going on with that tongue:
 |
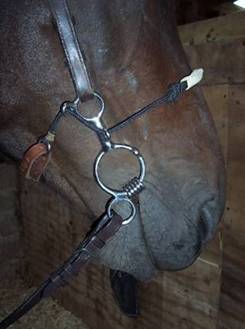
THE MYLER COMBINATION BIT
This bit is still very unrated and undeterestimated. It is a fabulous bit that is so kind yet so effective in mnay different situations - whether for a horse which is very sensitive or unsettled in the mouth, a strong horse, a high head carriage, etc. We would not be without a Myle Combination in the tackroom at any price!
Design
Unique in design, and one of the kindest bits available, the Myler’s Combination Bit is a hybrid of a ring bit and a shank bit, with some Hackamore influences (but see below). The design features a large centre ring to support the mouthpiece, a top ring for the bridle and a bottom ring for the reins. The distance between the top and bottom rings determines the amount of leverage, with the short and long shank combination at opposite ends of this scale and the medium or 3-ring combination giving a choice of rein options.
The lightweight mouthpiece slides freely on the centre ring until the degree of shank rotation brings it up against the ring stop. A rawhide-covered rope noseband and a jaw strap are linked together and run through two small offset rings on the purchase.
The Myler Combination Bit is not a hackamore nor a hackamore combination. The fit of both the noseband and jaw strap is higher, with the noseband set above the nostrils (like a Cavesson), so it cannot restrict the horse’s airway. The noseband and jaw strap are fitted snugly, but not tight, against the horse’s face, so the action of the bit is smooth and efficient.
Action
Utilising various pressure points, Myler Combination Bits offer simultaneous interaction of the mouthpiece, jaw strap and noseband. When rein pressure is applied, the Myler Combination Bit exerts pressure on the horse’s nose, poll and jaw (ie only 33% of the total in each area.) If the rider continues to apply rein pressure, the mouthpiece will meet the ‘stop’ on the ring and start to engage, whereupon the total pressure applied by the rider will be dispersed over 5 areas – the nose, poll, jaw, tongue and bars (ie 20% in each.)
The pressure exerted on the horse’s nose, jaw and poll are extremely effective at getting the horse to relax at the poll and “roll over from the withers”, to hold a rounded outline.
Mouthpieces
Myler Combination Bits are available with all levels of mouthpieces, from Comfort Snaffles to Ported Barrels. Because all pressure areas engage and release at the same time, the horse is offered a pressure-free reward whenever he is light and relaxed at the poll, (providing, of course, that the rider relaxes his hand.) This makes the Myler Combination an excellent training tool, for horses ranging from youngsters to well-schooled campaigners.
All Myler Combination Bit mouthpieces are made from Sweet Iron which will corrode gradually over time giving a taste that the horse will love.
Use
The Myler Combination Bit is particularly suitable as the first bit for a young horse or pony, which will be used to head pressure signals from being led in a head collar. It can also be a great bit for horses who are very nervous in the mouth; ex-racehorses who have been trained to “run into their mouths” and are reluctant to come into a schooled-horse outline; and older horses who think they know it all and will benefit from a very different feel in the communication they receive from the rider.
Many professional event riders find the Myler Combination invaluable to get the horse relaxed and going as softly as possible and working well off the other aids, before they replace it with a permitted bit for their dressage test.
Preparing Your Myler Combination Bit
Along with the cord knots either side of it, the rawhide nosepiece’s hard and knobbly surface is part of the signalling mechanism, but it can be shaped to the individual horse’s face by soaking in warm water until it is pliable. It will then set in this customised shape as it dries. If the nose is very sensitive, the shaped nosepiece can be wound with a thin layer of vet wrap, or the special Myler Combination sheepskin sleeve, but it should never be encased in thick sheepskin or similarly altered.
Attaching the Myler Combination Bit to Your Bridle
Remove your existing noseband from your bridle and attach your cheek pieces to the top of the purchase (the part which is angled out from the horse’s face to avoid rubbing.) The purchase on a Myler Combination is much longer than that on an ordinary bit, so you may need to make extra holes in your headpiece, or change the cheekpieces for a smaller size.
Tacking Up
Before you bridle your horse, ensure that the combination’s jaw strap is opened as far as possible to allow the maximum room for correct, controlled fitting. (Be careful not to loose the metal keepers on the jaw strap when doing this.)
Fitting
Fit the mouthpiece as normal. Position the rawhide nose piece high on the horse’s nose, so it doesn’t interfere with the horse’s breathing in any way. It must lie on the nose bone above the nasal cartilage but must not be fitted so high that it rubs the projecting cheek bones. No additional noseband is needed. Tightness and Readjustment For a correct fit, the jaw strap must be adjusted until it is possible to fit only the tip of your little finger under the nosepiece. This will need to be checked several times during the first few rides and then each time you ride subsequently, because the cord can stretch. You may need to make extra holes in the jaw strap to ensure the right fit. The old-style leather curb strap is gradually being replaced with a black man-made strap which is resistant to stretching and cracking. If not supplied with your bit, these are available through your retailer. |
|
Transitioning Your Horse into his Myler Combination Bit
It is very important to take your time to transition your horse into any new bit but particularly vital if it is a Myler Combination Bit because it will feel so different to the horse.
With the Myler Combination Bit, you have 2 things to show the horse, so transition him into the mouthpiece first, leaving the jaw strap on the loosest fitting, until he has 'given' once or twice. When showing him the effect of the nose, jaw and poll pressure, do ensure that you tighten the jaw strap very gradually, hole by hole over a few minutes, so the horse has plenty of time to get used to the totally new action of the bit.
Ensure that the nose strap remains high on the nose throughout (if necessary use string or tape to support it from the headpiece or cheek pieces, until it is tight enough to stay up on its own).
The horse will instantly cause himself pressure on the face if he demonstrates any of the usual evasions (eg. head up, mouth open, etc.) and time and care must be taken to make sure he learns the new “rules” without frightening himself.
Be very careful not to pull on the reins when leading or mounting the horse and to move off with an extra-light hand when riding with the Myler Combination Bit for the first time.
Untacking
When removing the combination, it is vital to release the jaw strap completely, so that when the horse opens his mouth to release the mouthpiece, he doesn’t cause himself pressure against the partially-opened jaw and nose strap.
Care of Your Myler Combination Bit
Like any piece of equipment, care should be taken to fit the combination correctly and to check its fit and condition on a daily basis. Further details are provided in the swing ticket on each new bit and every retailer has been trained to advise on its correct fit and use.
The mouthpiece should be wiped down after used to ensure the corrosion of the sweet iron takes place evenly and gradually. The rawhide, cord, and man-made jaw strap may be wiped gently with a damp cloth. Leather jaw straps can be cleaned like any other leather strap.
FOR MORE INFORMATION ON MYLER BITS OR FOR FURTHER ADVICE THEN PLEASE CONTACT E.M.T. OR, BETTER STILL, BELSTANE DIRECTLY.THEIR WEBSITE IS WWW.BELSTANE.COM. TELEPHONE: 01335-372600
For independent bitting advice then please contact Hilary Vernon - www.informedbitting.com
In the wake or recent comment regarding the use (or misuse) of Myler Combination bits please read the responses from -
Belstane
Hilary Vernon and Equine Management and Training
* * * * * * *
These articles will cover all aspects of equine management and training but is only intended to provide a guideline and is not to be construed as a substitute to seeking professional advice for individual situations.
Please do not hesitate to contact us for assistance.
* * * * * * * *
EditRegion1